Remove Background Noise in Filmora: Denoise, Preview, and Verify the Export
Use Filmora's current Audio Denoise controls, compare one passage carefully, export a short check, and know when a saved-file fallback fits.
Quick answer
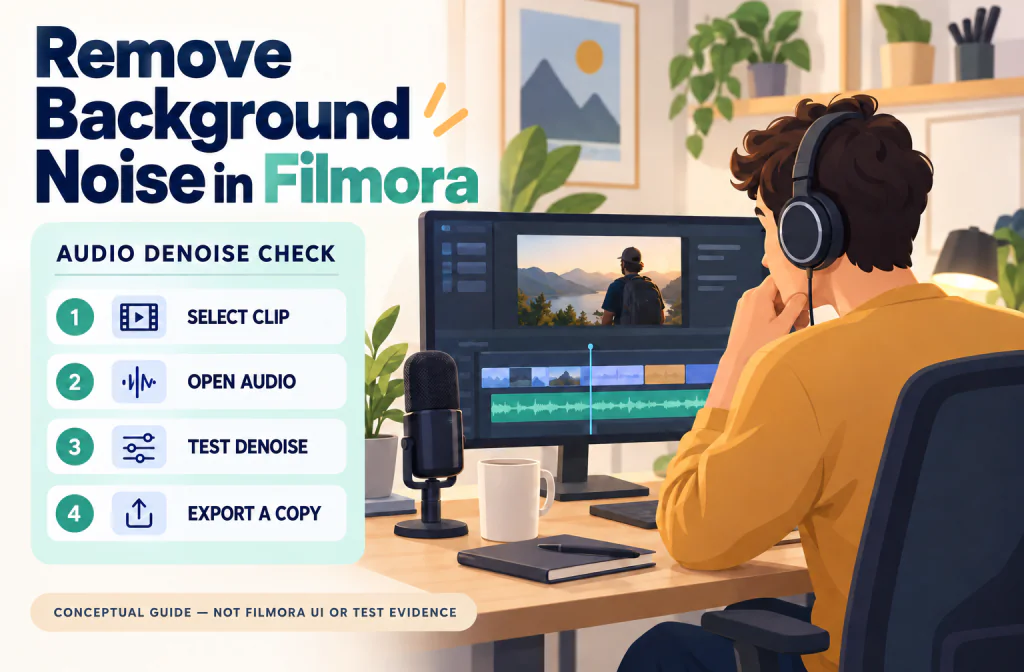
To remove background noise in Filmora on desktop, select the video or audio clip in the timeline, open Audio in the right-side properties panel, expand Denoise, and enable the mode that matches the problem. Filmora's current documentation lists choices including Normal Denoise, Wind Removal, Hum Removal, Hiss Removal, DeReverb, and AI Speech Enhancement. Test only one mode first, replay the same sentence, and keep the lightest setting that makes the noise less distracting without cutting words or making the voice brittle.
Then use Export > Local to save a short review copy and play that file outside Filmora. If the native result is still unsuitable, an independently owned saved video can be evaluated with the video background-noise remover. That is a separate upload-and-review workflow, not a Filmora plug-in, live filter, or guaranteed repair.
Confirm the Filmora version and platform
Wondershare's current version page identifies Filmora 15 as the current generation. Its desktop denoise guides use a similar overall path on Windows and Mac, but individual labels and available controls can differ by build, operating system, license, media type, and workspace layout. Check Help > About Filmora or the equivalent About screen before relying on instructions written for another version.
This guide was checked against Wondershare's current Filmora 15, Windows denoise, Mac denoise, mobile denoise, and local-export documentation. It does not present an account-specific Filmora 15 test or an original Filmora screenshot. If your panel differs, use the current guide for your platform rather than clicking a control merely because an older tutorial shows it.
Preserve the source before changing the project. Duplicate the project or timeline clip, and record the clip's duration, frame rate, audio layout when visible, and one clear sync point near the beginning, middle, and end. The recording-preparation checklist explains how to keep a clean rollback path before processing.
Diagnose the noise before choosing a control
Listen to a representative 15–30 second passage before opening Denoise. It should include ordinary speech, the unwanted sound under speech, a short pause, and a quieter word ending. Write down what you actually hear:
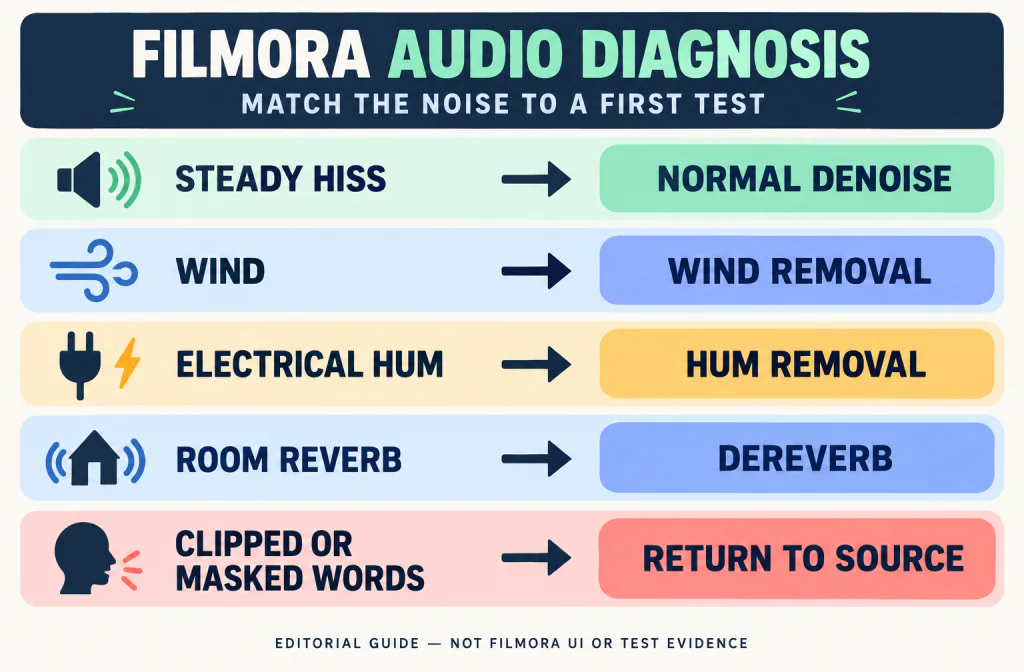
- Steady broadband hiss or fan-like wash: Normal Denoise is a reasonable first comparison.
- Air striking the microphone: try Wind Removal, but also consider whether the recording is physically overloaded.
- Low electrical buzz: Hum Removal is the relevant named control.
- High-frequency hiss: Hiss Removal is the relevant named control.
- Long room reflections: DeReverb is the relevant named control, although it cannot recreate detail that strong reflections already obscured.
- Speech that needs emphasis against a mixed background: AI Speech Enhancement is available in the current Windows documentation, but it should be compared as its own process rather than stacked automatically with every other mode.
A clipped microphone, missing packet, covered microphone, or word masked by louder sound is not simply “background noise.” Denoise cannot reconstruct information the recording never preserved. Return to the source, use a local edit, or re-record when the critical words are already incomplete.
Do not judge the result from a silent gap alone. A processor can make pauses impressively quiet while damaging consonants, breaths, and soft words. The useful comparison is the same spoken passage at a similar listening level.
Remove background noise in Filmora on Windows
Wondershare's current AI Audio Denoise for Windows guide documents this route:
- Import the video or audio and place it in the timeline.
- Select the clip that contains the audio you want to evaluate.
- Open the Audio settings in the right-side properties panel.
- Scroll to Denoise and activate the relevant control.
- Preview the same marked passage before making another change.
For Normal Denoise, the current guide lists Low, Mid, and Strong levels and notes that lower settings apply less processing. Start with Low. Move to Mid only when the named noise remains distracting and speech still sounds complete. Strong is not automatically better; compare it only when a lighter setting clearly fails.
The same documentation lists AI Speech Enhancement, Wind Removal, Hum Removal, Hiss Removal, and DeReverb. Treat them as problem-specific starting points, not a checklist to enable all at once. If you change several controls together, you will not know which one helped or which one damaged the voice.
Use the panel's reset control when the result becomes less natural. Returning to a known baseline is safer than compensating for over-processing with more effects.
Remove background noise in Filmora on Mac
Wondershare's current AI Audio Denoise for Mac guide places the controls in the right-side Properties Panel:
- Import the media and add it to the timeline.
- Select the timeline clip.
- In the Properties Panel, open Audio.
- Open Denoise and enable the relevant AI Denoise option.
- Preview the marked words and compare them with the untreated clip.
The Mac guide specifically names Hum Removal, Hiss Removal, and DeReverb. Do not assume a Windows screenshot proves that the same choices, order, or strength labels will appear on Mac. Follow the controls visible in your current build and change one item at a time.
If the Properties Panel is hidden or showing a different media type, confirm that the intended timeline clip—not an empty track, title, or transition—is selected. Reopen the Audio section after selecting the clip. A missing control may be a selection or version issue rather than a failed denoise operation.
Use a reversible native workflow
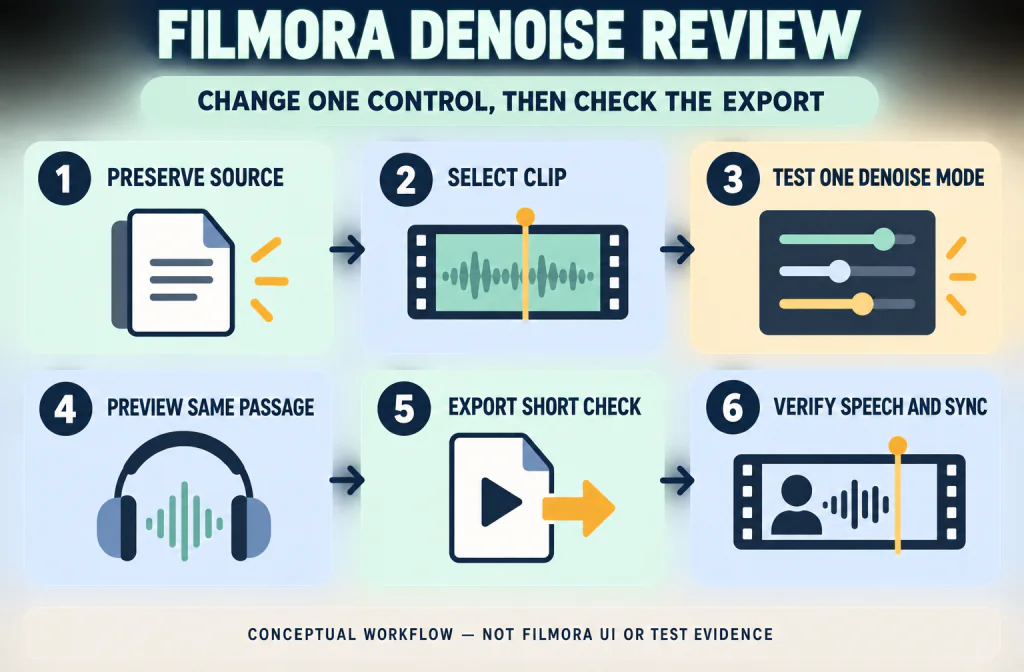
The most useful Filmora workflow protects the original and produces a file you can verify:
- Save a duplicate project or duplicate the target clip.
- Mark one passage with the main noise under speech.
- Bypass every unrelated audio effect for the first comparison.
- Enable one Denoise mode that matches the diagnosed problem.
- For Normal Denoise, start with the lowest documented level.
- Replay the exact same words at a similar monitor level.
- Check speech, noise, room stability, and any wanted music separately.
- Export a short named review file and play it outside Filmora.
Compare the same phrase with the control enabled and bypassed. Ask four separate questions:
- Is the named noise less distracting while the person speaks?
- Are word starts, endings, names, and numbers still complete?
- Does the voice remain stable and natural rather than watery, metallic, or gated?
- Are wanted ambience, music, and other speakers still acceptable?
The Before-and-After audio review guide gives a broader listening checklist. In Filmora, apply that method to your own lawful media rather than treating the visual waveform or a preset name as proof.
Export a short local file and verify it
Wondershare's current local export guide documents Export > Local and shows format, location, resolution, frame rate, size, and duration as review points. It also provides a Settings area for choices such as resolution, bitrate, and frame rate. Use settings that fit the source and project; do not change frame rate or resolution casually while testing an audio adjustment.
Give the short file a name such as interview-filmora-denoise-test-01.mp4 and save it beside—not over—the untreated reference. Before a full render, check:
- the expected container and file location;
- picture and audio from the first second to the last;
- source and export duration;
- a visible sync cue near the start, middle, and end;
- the marked noisy sentence at a similar playback level;
- wanted music, ambience, and other speakers;
- the actual file in a player outside Filmora.
The MP4 audio-cleanup guide explains why a video container needs both sound and timing checks. The video/audio sync checklist separates constant offset, progressive drift, local edit errors, and preview-only lag.
This article has not performed or documented a sample-specific Filmora export and reimport. The short-export procedure is an acceptance method you should run on your own source, not a claim that a particular file passed.
Use Filmora mobile controls separately
Do not copy the desktop panel path into the mobile app. Wondershare's current Filmora mobile AI Denoise guide starts with New Project, imports the video, selects the audio track in the timeline, then uses Noise Reduction in the bottom toolbar to enable AI Denoise.
Use the same listening discipline: preserve the original, mark one phrase, change only the denoise control, and export a short check before committing a long project. The mobile guide does not establish that every desktop mode or strength choice is available on a phone or tablet.
Troubleshoot Filmora denoise without guessing
| What happens | Check first | Safer next action |
|---|---|---|
| Denoise is missing | Selected clip, Filmora version, platform, and Audio panel | Select the actual media clip and check the current platform guide |
| The background is quieter but words disappear | Same phrase with the control bypassed | Reduce the level, disable stacked modes, or return to source |
| Voice sounds metallic or watery | Whether several processors are active | Test one lighter mode on a duplicate clip |
| Wind still overwhelms speech | Whether the microphone clipped or the voice was masked | Use a less damaged source, local edit, or re-recording |
| Hum remains after Hum Removal | Whether the sound is truly steady electrical hum | Diagnose the frequency and source before adding more processing |
| Music pumps behind speech | Whether dialogue and music share one mixed track | Isolate dialogue in the project or use a lighter pass |
| Timeline preview stutters | Computer load and exported-file playback | Export a short check before changing audio timing |
| Export is out of sync | Start point, duration, frame rate, and edits | Return to the duplicate project and compare three sync points |
| Export sounds different from preview | Actual local file, player, and export settings | Judge the deliverable and repeat a shorter controlled export |
If a fan or air conditioner is the source, move the microphone, reduce reflective surfaces, and change the physical noise safely before increasing processing. If keyboard noise appears only in pauses, local cuts or a carefully configured gate may be more transparent; the noise reduction versus noise gate guide explains why these tools solve different problems.
When a saved-file fallback fits
Use Filmora's native controls first when you need timeline context, clip-level adjustment, music balance, cuts, and immediate picture/sound review. A separate saved-file workflow becomes relevant only after you export an independently owned working copy and confirm that the native result is not suitable.
For that narrow case, preserve the original, choose a representative export, and inspect the current video background-noise remover for compatibility. Review the returned file independently before replacing anything in Filmora. Confirm that picture, duration, speech, and sync still pass; do not assume an accepted upload guarantees a usable project result.
This fallback cannot operate inside Filmora, control a live microphone, repair clipped dialogue, separate every competing speaker, or restore words hidden by loud music. It also does not replace Filmora's timeline, local edits, channel routing, or export settings.
For a different desktop editor, use its own current controls. The Camtasia noise-removal guide covers TechSmith's platform-specific native effect, while the Canva video noise guide covers Enhance Voice and a browser-based MP4 review. Do not copy their control paths into Filmora.
Common Filmora scenarios
Talking-head video with steady fan noise
Choose a sentence that includes soft consonants while the fan is running. Test Normal Denoise at Low first. Keep the pass only if the fan becomes less distracting and the voice retains its edges. Export a short section with visible lip movement and check sync outside Filmora.
Outdoor clip with wind on the microphone
Try Wind Removal on a duplicate, but inspect whether gusts overloaded the microphone. When words are clipped or fully masked, stronger processing may create unstable speech without restoring the missing detail. Prefer an alternate take, local edit, subtitles, or re-recorded narration when available.
Interview with hum and room echo
Identify which problem is dominant before enabling anything. Test Hum Removal alone, reset, then test DeReverb alone on the same phrase. Stacking both immediately makes the trade-off harder to understand. Keep the least processing that solves the main distraction.
Tutorial with narration and music
If narration and music are on separate tracks, process only the dialogue clip. If they are already mixed, check the music during speech and pauses because speech-focused processing can change wanted content. A quieter noise floor is not a success when the soundtrack pumps or loses detail.
Long project with changing locations
One setting chosen for the introduction may be too strong for a quiet section later. Test passages from each recording condition and split the work into clips when needed. Review the final full export from beginning to end after the short tests pass.
Frequently asked questions
Where is background noise removal in Filmora?
In the current desktop guides, select the timeline clip, open Audio in the right-side properties panel, and find Denoise. On mobile, select the audio track and use Noise Reduction in the bottom toolbar. The exact interface can vary by platform and version.
Which Filmora denoise mode should I use?
Match the first test to the sound: Normal Denoise for steady general noise, Wind Removal for wind, Hum Removal for electrical hum, Hiss Removal for hiss, and DeReverb for room reflections. Compare one mode at a time; the name does not guarantee a good result for your recording.
Should I choose Low, Mid, or Strong Normal Denoise?
Start with Low because Wondershare documents it as the lighter processing level. Move higher only when the same spoken passage still contains a meaningful distraction and the voice remains complete and natural.
Can Filmora restore clipped or hidden words?
No denoise control can reliably reconstruct speech information that was never captured. Use another take, local repair, subtitles, or re-recording when critical words are clipped or masked.
Why does the exported file sound different from the preview?
The timeline preview and rendered deliverable are different checks. Review the actual local export in another player, confirm its settings and duration, and compare the same phrase before changing more controls.
Can Noise Cleaner work as a Filmora plug-in?
No. It is a separate saved-file workflow. Export an authorized working copy, verify compatibility, and review the returned file before bringing it back into an editing project.
Sources and evidence notes
- Wondershare Filmora: AI Audio Denoise for Windows documents the current desktop selection path, Denoise panel, named modes, Normal Denoise levels, and reset controls.
- Wondershare Filmora: AI Audio Denoise for Mac documents the Mac Properties Panel path and current Hum Removal, Hiss Removal, and DeReverb controls.
- Wondershare Filmora: Export to local documents the Local export route and the format, location, resolution, frame rate, size, duration, and settings review.
- Wondershare Filmora: latest versions and features identifies Filmora 15 as the current generation.
- Wondershare Filmora mobile: AI Denoise documents the separate mobile New Project, timeline selection, and Noise Reduction toolbar route.
These official pages were rechecked on September 13, 2026. They support the feature names, menu paths, version context, and export checks described here. They do not prove an improvement for a particular recording, account, device, or export. No installed Filmora 15 test, account-specific screenshot, rights-cleared source clip, same-segment Before-and-After file, export/reimport result, or technical-review outcome is presented. The three images are conceptual editorial media, not Filmora UI, measured waveforms, or product evidence.
Final decision
Use one Filmora Denoise mode on a duplicate clip, compare the same noisy words with the effect bypassed, and export a short local proof before processing the full project. Keep the result only when speech stays complete and natural, wanted sound remains acceptable, and the actual video file passes duration and sync checks.
If Filmora's native result is unsuitable and you own the saved video, evaluate a working copy with the video background-noise remover, then keep it separate until playback and timing pass. Return to the source, local repair, or re-recording when denoise removes wanted detail or the original never captured the words.