How to Reduce Fan Noise in a Voice Recording
Identify fan noise in a voice recording, test cleanup safely, compare the same spoken passage, and know when manual repair or re-recording is better.

Quick Answer
If your voice recording has a steady fan-like wash, keep the original untouched, make a working copy, and choose one spoken passage where the noise is easy to hear. Test cleanup on that copy, then compare the same words at a similar playback level. The Noise Cleaner microphone noise remover fits this saved-file workflow when the speech is still understandable and the fan is the main distraction. It is not a live microphone filter, and it cannot reliably rebuild words hidden by loud noise, clipping, or distortion. Keep the cleaned file only when the fan is less distracting and the voice remains complete and natural. If a high motor whine remains or the fan changes speed, targeted manual repair may be the better next step.
Start here: Preserve the original and diagnose what you hear before trying to make the background silent.
First Confirm That It Is Really Fan Noise
People often call any steady background sound “fan noise,” but the first repair depends on what is actually in the recording. A desk fan can create a broad air-like wash. A laptop fan may rise and fall with computer load. A small motor can add a narrow high-pitched whine. Air hitting the microphone directly causes irregular bursts and rumble instead of a stable background bed.
Listen to three places in the untouched file:
- A pause that exposes the background on its own.
- A normal sentence with the unwanted sound under the voice.
- The hardest moment, such as a quiet word or a point where the fan changes speed.
Use the pause to identify the sound, but use speech-under-noise to judge any repair. A quiet gap does not prove that consonants, breaths, or word endings survived cleanup.
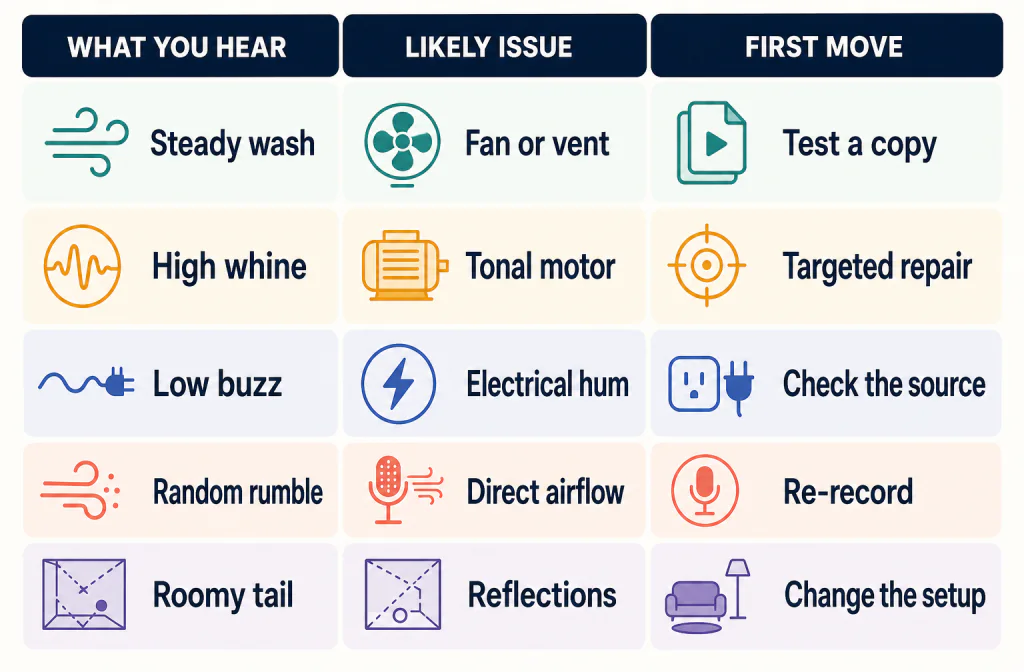
Different sounds need different first actions. Editorial diagram; not measured sample data.
| What you hear | More likely issue | Sensible first move |
|---|---|---|
| A steady, air-like wash under speech | Fan or ventilation noise | Test cleanup on a copy |
| A narrow whine that changes with fan speed | Tonal motor noise | Consider targeted manual repair |
| A low buzz with a stable pitch | Electrical hum | Check power, cables, and the recording source |
| Thumps or rumble when air reaches the microphone | Direct airflow | Change the setup and re-record when possible |
| A hollow tail after each word | Room reflections | Improve placement or use a room-specific repair path |
| Harsh, flattened loud words | Clipping or source distortion | Return to the original; denoising is not reconstruction |
Audacity's official Noise Reduction manual uses fan noise as an example of constant background noise that its conventional effect may reduce. It also warns that irregular, changing, loud, or speech-overlapping noise may not produce a satisfactory result. That guidance describes Audacity's effect, not a guaranteed Noise Cleaner result, but it explains why diagnosis and listening matter (Audacity Manual: Noise Reduction).
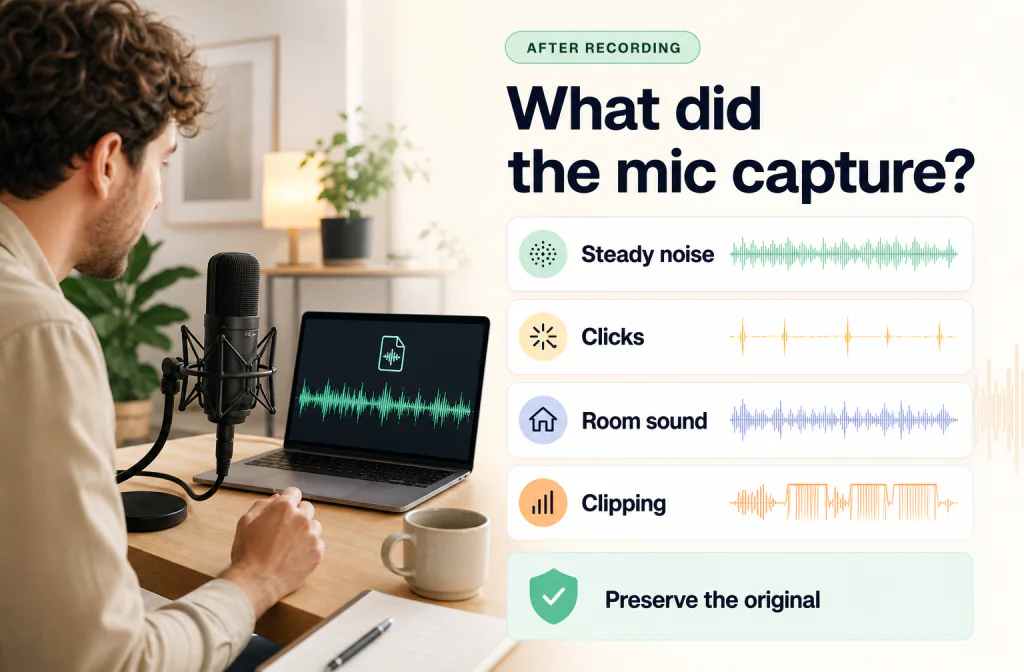
For a broader check when the recording contains clicks, echo, clipping, or another voice as well, use the post-capture microphone recording guide.
Why the Fan Is So Noticeable in Your Recording
The problem is usually not the fan alone. It is the balance between the voice and the background at the microphone.
- The microphone is too far from you. The voice becomes quieter while the fan stays present.
- The fan is close to the microphone. A laptop vent, desktop tower, or room fan can dominate a nearby mic.
- Air crosses the capsule. Direct airflow creates unstable low-frequency bursts that behave differently from steady fan wash.
- The fan changes speed. A laptop may ramp during recording, so one treatment may not fit the whole take.
- The voice is already damaged. Clipping, heavy compression, or a previous denoise pass leaves less clean detail to protect.
This is why a waveform alone cannot tell you whether the recording is fixed. It can help you return to the same time window, but it cannot reveal whether a soft consonant disappeared or the voice became watery.
Set Up a Fair Listening Test
Before uploading anything, choose a 12–20 second passage with a complete sentence, fan noise under speech, and a short pause. Write down the start and end time. If one word is difficult to understand in the original, note that before processing so the cleaned version does not receive credit for detail that was never captured.
Use the same headphones or speakers, the same player, and a similar volume for both versions. If the cleaned file plays louder, adjust playback before deciding which one sounds better. Loudness can change preference even when the underlying noise problem has not improved.
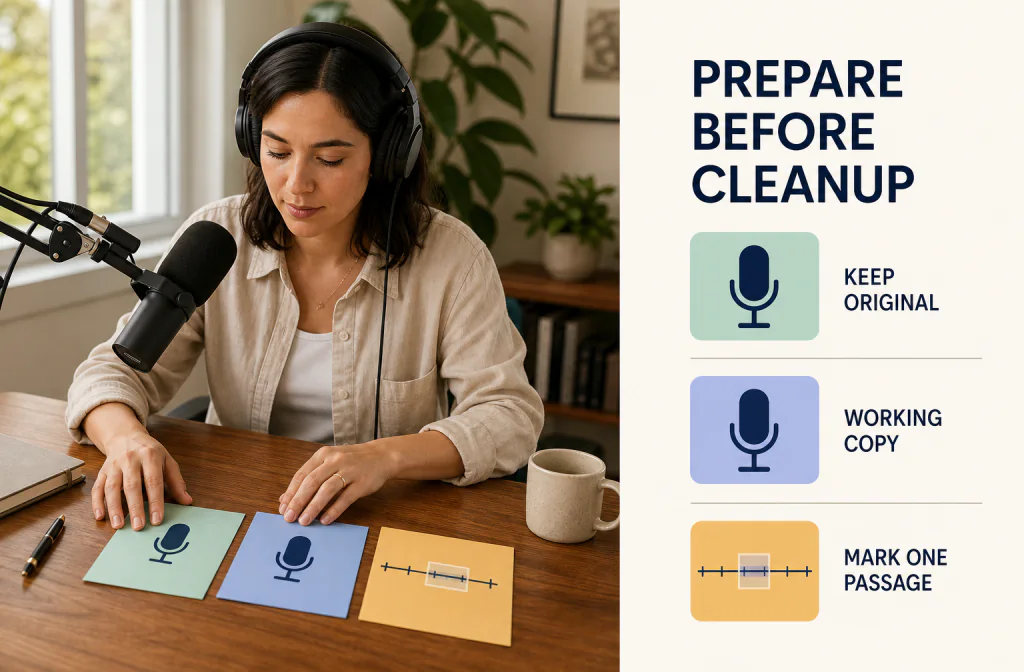
The recording preparation checklist gives you a repeatable way to protect the source, name the working copy, and mark the passage before cleanup.
Step by Step: Reduce Fan Noise Without Losing the Voice
1. Preserve the untouched source
Duplicate the best original recording and make all edits on the copy. Do not overwrite the only file or process an already processed export when a cleaner source exists. If the result sounds metallic, dull, gated, or incomplete, the original is your way back.
2. Mark a representative passage
Use the timestamps from your fair test. Include normal speech with the fan underneath it, not only a silent gap. If the fan changes speed, mark a second difficult passage as well.
3. Choose the right first repair
Test saved-file cleanup when the noise is broadly steady and the speech is understandable. Choose manual repair when a narrow tone or a few isolated events need precise attention. Re-record when important words are masked, the microphone was hit by direct airflow, or the voice is clipped too badly to judge.
4. Upload the working copy
Open the fan-noise cleanup workflow in Noise Cleaner and use the current interface to select the saved working file. Accepted input, duration, channel, layout, and byte limits depend on the current media policy and account, so rely on the upload guidance you see instead of an old static list.
Noise Cleaner processes saved files after recording. It is not a real-time filter for a call, stream, or active microphone input.
5. Compare the exact same words
Return to the marked timestamps in the original and cleaned versions. Ask two separate questions:
- Is the fan less distracting while you are speaking?
- Is the voice at least as clear, complete, and natural as before?
Listen specifically to word beginnings, word endings, soft consonants, breaths, and any part where the fan changes speed. A quieter background is not a win if speech becomes harder to follow.
6. Check the hardest moment
Do not approve a whole recording from its easiest sentence. Review the quietest useful phrase, the strongest fan overlap, and any already-damaged speech. The right result depends on the destination: a private meeting note may tolerate more residual noise than a course lesson, podcast, or client voiceover.
7. Download only the version worth keeping
If the preview passes your listening test, download the cleaned file and open it independently. Check the beginning, marked passages, and end. Keep the source and cleaned version under different names. If the cleaned version is worse, reject it and return to the original instead of repeatedly processing the damaged output.
Keep, Retry, Repair, or Re-record?
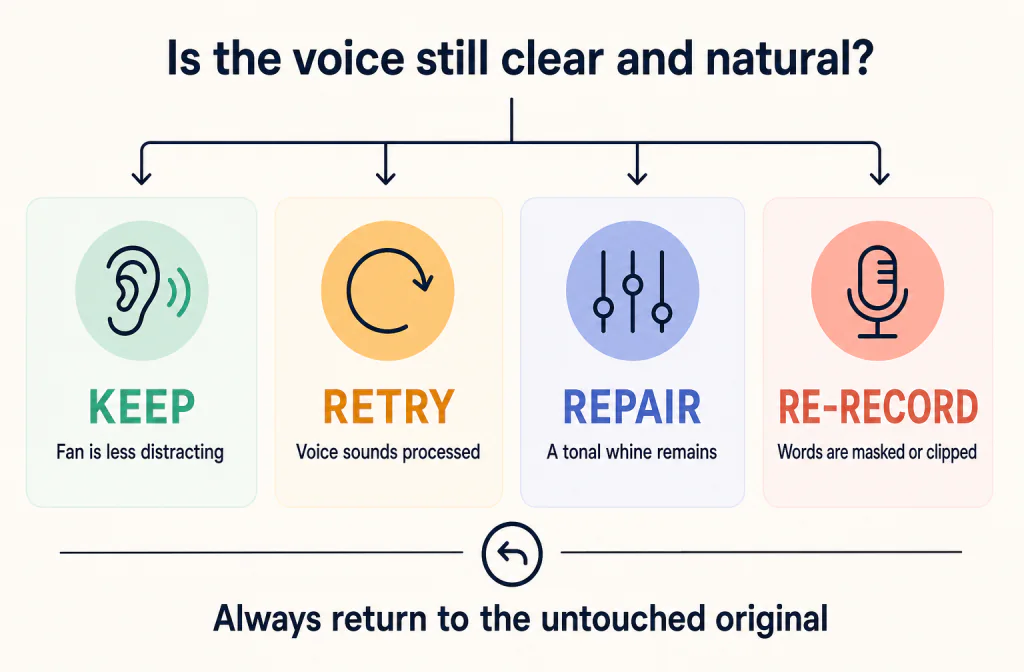
Judge voice preservation and residual noise together. Editorial decision diagram; not product or test evidence.
| What you hear after cleanup | Best next decision |
|---|---|
| The fan is less distracting and every word remains natural | Keep the download after a full-file check |
| The fan is quieter but the voice sounds watery, metallic, or unstable | Return to the source and try a different or lighter path |
| A distinct high whine remains | Use targeted manual repair rather than stronger broad cleanup |
| Some fan noise remains but speech is intact | Decide whether the residual sound is acceptable for your project |
| Consonants, breaths, or word endings disappear | Reject the processed version |
| Important words are masked or clipped in the source | Re-record or seek specialist repair when the material matters |
Adobe Audition documents a noise-print-based manual reduction workflow for editors who need detailed control. That is a useful alternative when you need targeted, adjustable repair; it does not imply that Noise Cleaner exposes the same controls (Adobe Audition: Noise reduction and restoration effects).
When Fan-Noise Cleanup Is Not the Right Tool
Do not keep increasing processing just because some noise remains. Switch paths when:
- the main problem is direct wind or airflow on the microphone;
- the recording is clipped or heavily distorted;
- another speaker overlaps the voice you want;
- the file contains strong room echo rather than a steady background bed;
- a motor whine needs a precise tonal edit;
- music or ambience must remain unchanged;
- the material is irreplaceable and needs careful, local restoration.
Noise reduction cannot guarantee silence or rebuild speech information that was never captured clearly. A small amount of natural background is often safer than missing consonants or a synthetic-sounding voice.
For the wider choice between AI cleanup, local editing, and re-recording, see the general background-noise removal workflow.
Troubleshooting a Disappointing Result
The fan is quieter, but the voice sounds watery
Reject that version and return to the untouched source. Repeated cleanup passes can make the damage more obvious. Try a different method or accept more residual noise if that keeps the speech natural.
The fan disappears in pauses but remains under words
The earlier method may be changing only the spaces between phrases. A gate does not remove a continuous fan bed while you are speaking. Judge whether a real denoise pass helps without removing voice detail. The AI cleanup versus noise gate comparison explains how to test the same passage and recognize each method's failure mode.
A high-pitched whine remains
The recording may contain both broadband fan wash and a tonal motor component. Mark where the tone changes and use targeted manual repair. Do not guess a filter frequency without examining the actual recording.
The background pumps up and down
The fan may be changing speed, or the processing may be reacting too strongly to speech. Review more than one passage. If continuity gets worse, keep the original or divide the repair into smaller sections with an editor.
Speech was unclear before cleanup
Do not mistake louder or brighter sound for restored words. Compare the transcript and the same marked phrases. If the information was missing in the source, re-recording is the honest fix.
Prevent Fan Noise in the Next Recording
Prevention improves the voice-to-background balance before processing begins.
- Move the microphone closer to you within the microphone maker's placement guidance, then reset gain for the closer position.
- Increase the distance between the microphone and the fan, laptop vent, computer tower, or air outlet.
- Keep direct airflow away from the microphone.
- Use the microphone's documented pickup pattern to favor your voice and place the fan toward a less sensitive direction when practical.
- Reduce avoidable computer load before recording if it causes the laptop fan to ramp.
- Record a short test, monitor with headphones, and check normal speech as well as loud peaks.
- Avoid clipping. A cleaner background cannot repair flattened speech peaks.
Shure's podcast-recording guidance recommends a quiet, soft-furnished space, a test recording, headphone monitoring, and conservative levels that avoid clipping. Exact distance, gain, and placement still depend on the microphone you use (Shure: How to Start a Podcast—Recording an Episode).
Frequently Asked Questions
Can fan noise be removed completely from a voice recording?
Not reliably in every file. A steady fan may be reduced substantially, but the result depends on noise level, changing fan speed, overlap with speech, source quality, and any artifacts created during processing. Aim for less distracting noise with preserved speech, not guaranteed silence.
Is a steady desk fan easier than a changing laptop fan?
A stable background is generally easier to test than a fan that repeatedly ramps up and down. You still need to compare the same spoken passage because even steady noise can overlap important voice detail.
Should I use a noise gate first?
Not when the fan is audible under speech. A gate mainly changes what happens when the voice falls below a threshold; it does not remove a continuous noise bed from the words themselves.
What if the fan has a high-pitched whine?
Treat the whine as a separate tonal component. A targeted manual repair may be safer than increasing broad reduction across the whole recording.
Can Noise Cleaner remove fan noise during a live call?
No. This guide covers a saved recording processed after capture, not live microphone suppression.
Does a quieter waveform prove that the file is cleaner?
No. A waveform can help you find the same time window, but you still need to listen for intelligibility, naturalness, residual noise, and new artifacts.
Should I process the cleaned file again?
Start each test from the untouched original. Reprocessing an already cleaned output can accumulate damage and make it harder to identify where the voice changed.
Sources and Editorial Notes
- Audacity Manual — Noise Reduction — used for its description of constant fan noise, conventional noise-profile behavior, difficult variable noise, and artifact cautions. It does not verify Noise Cleaner performance.
- Adobe Audition — Noise reduction and restoration effects — used to identify a current manual, noise-print-based alternative for editors who need detailed control.
- Shure — How to Start a Podcast: Recording an Episode — used for quiet-room, test-recording, monitoring, and clipping-prevention guidance.
- The illustrations on this page are editorial explanations. They are not product screenshots, measured waveforms, or Before-and-After evidence.
- This guide does not claim a fan-specific test result. Your recording should be judged with the same-passage listening method described above.
Test Your Saved Fan-Noise Recording
Start with the best source you have, preserve the original, and compare the same difficult passage before and after processing. Keep the cleaned version only when the fan is less distracting and the voice remains clear and natural.